Set Up Your Claude Code Knowledge Work Coach
You have bought the Coach, so your Second Brain OS account is live.
By the end of this guide, two things are true. Your notes are sat on your own machine, searchable by meaning, with an employee that keeps writing into them as you work. And the window you did all that in turns out to be the most capable tool on your computer.
That second part is the one nobody warns you about, so here it is in advance. Once this hour is done, every program on your Mac becomes something your AI can use. A draft becomes a client-ready PDF in one line. Forty PDFs give up their text so you can search all of them at once. An iPhone photo becomes a web image, stripped of the GPS coordinates that were quietly telling the internet where you live. A client call gets transcribed without the recording ever leaving your machine.
None of that is the point of today. Today is the plumbing. But you will start noticing it by the end of the week, and I would rather you knew it was coming than discovered it by accident in a month.
You have probably never opened a terminal. Nothing below assumes you have. There are eleven steps, most of them one line each, and you are typing plain English by the end of them.
Take out one uninterrupted hour, and I promise you will join the people of 2030 in 2026.
Before anything: where the folder goes
This is the one decision that causes real pain later, so it comes first.
There are two sensible places to put your knowledge folder, and the choice comes down to whether you want
- To speak and capture random ideas from your iPhone in real time?
- To be able to use Claude Code from your iPad with the same great experience?
If yes to either, then we do need the cloud, or iCloud to be precise. So the folder has to sit somewhere iCloud syncs, because that is the only place an iPhone and iPad can reliably write to. On a Mac that means the Documents folder.
BUT if you don’t get ideas worth capturing and have no intention of using Claude Code as a power user/power writer on an iPad mini, then nothing needs to sync to the cloud.
Here’s a quick visual to help you decide:
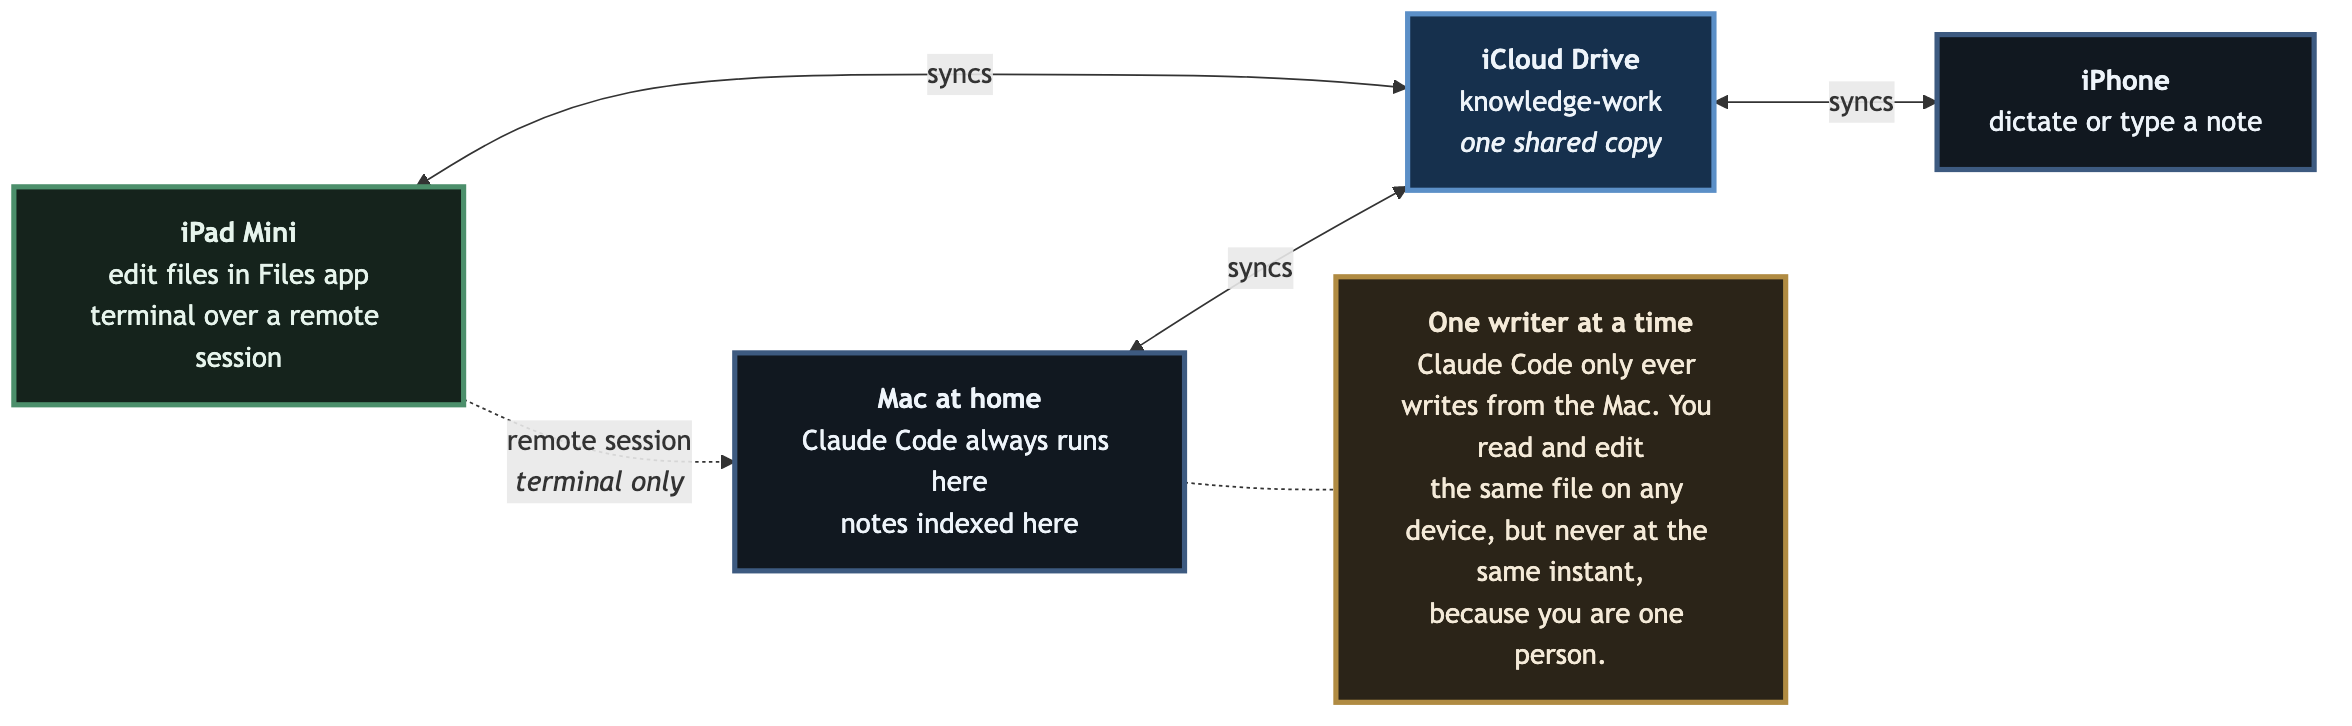
Your iPhone and iPad get a copy. There is one shared folder, and iCloud keeps your Mac, iPad and your iPhone pointed at it. A note you dictate on a walk is on your Mac by the time you sit down, and the search has already indexed it. And the same note can be expanded into a newsletter with Claude Code via an iPad mini at a coffee shop.
Things never go wrong, because Claude Code (as you will see in the next post) always edits & works from your Mac. And you have the flexibility to edit files from your iPhone, iPad or Mac. At the exact same moment, the file is (technically and truly speaking) being edited from one device.
For example, you write on the Mac, you close it -> you dictate a thought on a walk -> you pick up an iPad at a coffee shop. When you instruct Claude Code to work, it always wakes up on your Mac and edits the document. The updated version is synced to iCloud in real time and available to your iPhone and iPad immediately.
You and Claude Code can go back and forth on the same document all afternoon with no conflict at all, because every change is being written by by one machine at any given time. That is what makes a 300 gram tablet a serious place to work from, and it is the whole subject of the next guide.
| Synced folder | Home folder | |
|---|---|---|
| Where | ~/Documents/knowledge-work |
~/knowledge-work |
| Phone capture | Works | Not possible |
| Working from an iPad Mini | Works | Difficult |
| Your notes live | On your machine and in iCloud | On your machine only |
| Extra setup | Two permissions, below | None |
Neither is the wrong answer. But my own and other’s experience is this.
It’s easier to speak out a great idea, the moment it happens so it doesn’t disappear 3 seconds later.
Phone capture is the single feature people most often say changed how much they actually write down, because the note gets made at the moment you think. The alternative is as good as never having the idea in the first place.
All it means is your notes are in iCloud as well as on your disk, and if that is a line you do not want to cross, the home folder is clean and everything else in this guide works identically.
Wherever you put it, avoid Desktop, Downloads, OneDrive and Dropbox. Desktop and Downloads carry the same permission gating as Documents without the benefit, and OneDrive and Dropbox rewrite files underneath you in a way that fights with version history.
If you chose the synced folder, do these two things now
Both are one-time. Doing them before anything is installed saves you hitting an error (and confusion) later.
1. Check that Documents actually syncs. This is off for plenty of people and nothing warns you. Open System Settings → your name at the top → iCloud → Drive, and confirm “Desktop & Documents Folders” is on. If it is off and you leave it off, your folder is Mac-only. So switch it on.
2. Give Terminal access to Documents. macOS gates Documents app by app, and the terminal is an app like any other. Open System Settings → Privacy & Security → Files and Folders, find Terminal in the list, and switch on Documents.
If Terminal is not in the list yet, it appears the first time something tries to reach the folder, and macOS shows a prompt asking you to allow it. Say yes to that prompt and you are done.
Worth knowing what you just granted: this gives anything you run in Terminal access to your Documents, not only Claude Code. For most people that is a fair trade for a terminal they use deliberately, but it is your call and it is reversible in the same pane.
Grant it to Terminal rather than to Claude Code itself. Claude Code updates itself, and each update is technically a new file as far as macOS is concerned, so a permission attached to it stops applying the moment it updates. Terminal does not move, so the permission sticks.
If you are on Windows, or on a Mac with an Android phone (otherwise skip this section)
Everything above assumed a Mac and an iPhone, because that is the combination where the sync is already built in. Plenty of people reading this are on Windows, or on a Mac with an Android phone, and the setup works just as well. You choose the sync provider rather than inheriting one.
The principle does not change. One folder, one shared copy, the machine with Claude Code on it doing the writing. Only the provider differs.
| Your setup | Use | Where the folder goes |
|---|---|---|
| Windows + Android | Google Drive | C:UsersyournameMy Driveknowledge-work |
| Windows + iPhone | Google Drive, or iCloud for Windows | C:UsersyournameMy Driveknowledge-work |
| Mac + Android | Google Drive | ~/Google Drive/My Drive/knowledge-work |
| Linux + anything | Syncthing, or Dropbox | wherever you point it, outside a synced Documents |
Google Drive is the straightforward pick for almost everyone here. Install Drive for desktop, sign in, and it gives you a real folder on your disk that syncs in the background, exactly as iCloud does. Make your knowledge-work folder inside it rather than beside it. On Android, Google Drive is already there, which is the whole reason this is the easy path.
One setting matters more than any other, and it is the one people miss. In Drive for desktop, open Preferences → Google Drive and choose Mirror files, not Stream files. Mirroring keeps a real copy on your disk. Streaming keeps placeholders and fetches on demand, and a placeholder reads as an empty file to anything indexing it, so your search quietly returns nothing. Mirror, always.
If you are on Windows, ignore the macOS permission steps above. There is no Documents gating to work around. The equivalent trap is OneDrive, which Windows often points your Documents folder at without asking. Keep the knowledge folder out of OneDrive and out of Documents, for the same reason the Mac advice avoids Dropbox: it rewrites files underneath you and fights with version history.
For capture on Android, the iOS Shortcuts from Step 11 have no direct equivalent, but the pattern does. Google Keep with a widget, or any markdown notes app that saves into a Drive folder, gets you the same thing: a thought captured in the moment, landing as a file the watcher indexes. It is a little more assembly and the result is the same.
Everything from here is identical on every platform. The Coach does not care which provider is underneath, only that the folder is real and on your disk.
Step 1: Find your terminal
The terminal is an app that is already installed. You are not downloading anything here, just locating it.
macOS. Press Cmd + Space, type terminal, press Enter.
Windows. Press the Start key, type powershell, press Enter.
Linux. Ctrl + Alt + T, or search your applications for Terminal.
A window opens with some text and a cursor. That is it. That is the thing everyone finds intimidating.
Checkpoint: you have a terminal window open.
Step 2: Install Claude Code
Claude Code is the harness: the thing that runs on your machine and gives an AI model the ability to read and write your files directly.
One line, and it installs itself. Pick the line for where you are.
macOS, Linux or WSL:
curl -fsSL https://claude.ai/install.sh | bash
Windows PowerShell:
irm https://claude.ai/install.ps1 | iex
Windows CMD:
curl -fsSL https://claude.ai/install.cmd -o install.cmd && install.cmd && del install.cmd
On Windows, the two prompts look similar. Here’s what to do if you run into an issue:
- If you run a command and see
The token '&&' is not a valid statement separator, you are in powershell and need to useirm https://claude.ai/install.ps1 | iex - If you see
'irm' is not recognized, you are in CMD and need to usecurl -fsSL https://claude.ai/install.cmd -o install.cmd && install.cmd && del install.cmd
Native installs update themselves in the background, so you stay current without doing anything.
Checkpoint: run claude --version. It prints a version number followed by (Claude Code).
Step 3: Create the folder
Still in the terminal. Make the folder in the safe location from earlier:
If you chose the synced folder:
cd ~/Documents
mkdir knowledge-work
cd knowledge-work
If you chose the home folder:
cd ~
mkdir knowledge-work
cd knowledge-work
cd means “go to this folder”, mkdir makes the folder, and the second cd moves into it. You are now standing in your knowledge folder, which is where everything from here happens.
The first of these may bring up a macOS prompt asking whether Terminal can access files in your Documents folder. That is the permission from earlier arriving on cue. Allow it.
From here on this guide writes the synced path, ~/Documents/knowledge-work. If you took the home folder option, use ~/knowledge-work everywhere you see it. Nothing else differs.
Leave it empty for now. Your existing notes come in at Step 9, once the search is actually running and can index them the moment they land.
Checkpoint: the folder exists in your home directory and you are inside it.
Step 4: Install Second Brain OS
Still in the terminal, still inside your folder. Paste this in, with your own credentials in place of the example:
npx secondbrainos-mcp-server@latest recKFBcLn8NIVDPQ4:01a0a58f-3b3d-761a-95e2-406045bcb0eb
You can get the command from the My Agents tab in your Second Brain OS Dashboard
This registers your account so that everything you own, the Coach included, is available the moment Claude Code starts.
Checkpoint: the install finishes without an error.
Step 5: Start Claude Code and log in
Now start it, from inside your folder:
claude
The first run asks you to log in and opens your browser to finish it. A Claude Pro or Max subscription is the straightforward option. Once you are in, your credentials are stored and you will not be asked again. If you ever need to switch accounts, type /login inside a running session.
From now on, this is how you begin every time: cd ~/Documents/knowledge-work, then claude.
Checkpoint: you are logged in and looking at the Claude Code prompt, with your folder shown above it.
Everything from here happens inside Claude Code. You are no longer typing at the RAW terminal. Every remaining step is typed at the Claude Code prompt you are now looking at, and the next two start with a forward slash.
Step 6: Check that Second Brain OS connected
At the Claude Code prompt, type:
/mcp
You should see secondbrainos listed as connected. If it is missing, type /exit to leave, then cd ~/Documents/knowledge-work and claude to come back in, and check again. A restart resolves most of these.
Checkpoint: /mcp shows Second Brain OS connected.
Step 7: Start the Second Brain OS & Meet your Knowledge Work buddy
Two slash commands, and you do not need to finish typing either of them. Start typing and Claude Code offers you the full command; press Enter to accept it.
First, type /start and take the suggestion for:
secondbrainos:start_secondbrainos (MCP)
That loads your account and lists everything you own: your agents, your skills, your tools. It costs nothing to run and it is the map of what you have.
Then type /knowledge and take the suggestion for:
secondbrainos:agent_knowledge_work_claude_code_coach (MCP)
That is the Coach itself.
Checkpoint: the Coach has loaded and introduced itself.
Step 8: Let it set everything up
Tell it, in your own words, that you want your knowledge work environment set up. Plain English is the interface from here on.
It will ask a few things as it goes: your timezone, and which folders should be searchable. Answer plainly. You are not expected to understand the parts, and this is the last time anything here asks you for a setting.
Here is what it is actually doing, so nothing scrolling past is a mystery.
Hooks are tiny automations that fire at a set moment, like the light that comes on when you open the fridge. A model has no reliable clock, so left alone it will confidently date today’s note from its training data. One hook tells it the date, time and timezone the instant a session opens. Another stamps whatever it records with the real time from your machine at that second.
Git records changes line by line, which retires “final-v1”, “final-final-v2” and “ultra-final-v3” for good. Your folder becomes a tracked folder and you never learn a command. What you get is the diff: when a line changes you see the old one in red and the new one in green, so nothing you have written can be quietly overwritten.
Memory is how you like things done, as opposed to what you know. “Date at the top.” “Never use em dashes.” A few one-line files it reads at the start of every session, so you say a thing once instead of daily. This is the piece people miss when they try Claude Code alone, and it is why they quit in a week.
Local search indexes your notes so they can be found by meaning. The small model that reads them to understand them sits on your disk, no API key involved, and the index is a single file in your home folder. It also sets a watcher on your folder, so any new note/doc you create or an existing one you update becomes searchable immediately.
Checkpoint: the Coach reports setup is complete. Ask “what did you just set up?” if you want the list back in plain English.
Step 9: Bring your existing notes in
Setup is done and the search is live, so now the archive is worth moving.
Export your notes into the folder. Markdown is the format, which is just plain text with a little punctuation:
| Where your notes live now | How to get them out |
|---|---|
| Google Docs | File → Download → Markdown |
| Apple Notes | Watch this: Export Apple Notes To MD |
| Notion | Settings → Export content → Markdown & CSV |
| Obsidian, iA Writer, Bear | Already markdown, copy the files across |
Drop everything in. Do not sort it, tag it, rename it or arrange it into subfolders. Searching by meaning is what makes organising unnecessary, and doing it by hand now would be the last time for no reason.
The watcher the Coach set up notices the new files and indexes them on its own, so there is nothing to run. Give it a minute if you have just moved years of writing across, then ask the Coach whether it can see them:
How many notes can you see now?
If you have nothing to export, skip this. An empty folder fills up on its own as you work.
Checkpoint: the Coach reports it can see your notes.
Step 10: Prove it works
This is the moment the purchase justifies itself, so do not skip it.
Think of something in the archive you just brought in, something you know you wrote but cannot name precisely, then describe it badly, in the wrong words, deliberately:
Find that thing I wrote about pricing where I compared it to a gym membership.
You never wrote “gym membership” in that note. It comes back anyway, because the search matches meaning rather than words.
Three ways it can look, each worth trying once:
| Search type | Use it when | Example |
|---|---|---|
| Keyword | You know the exact word | “Stripe fee” |
| Meaning | You do not know the word | “payment costs eating margin” |
| Hypothesis | You know roughly what the answer says | “my note arguing against monthly retainers” |
Checkpoint: a note you had forgotten came back from a vague description. You are done.
Step 11: Capture from your iPhone by speakin or typing
Only if you chose the synced folder at the start. On the home folder there is nothing here to set up, and you can go straight to the next section.
Everything so far assumes you are sat at your machine. This is the part that covers the rest of the time, when the thought arrives while you are walking, driving or halfway through making dinner.
Two shortcuts, one for speaking and one for typing. Both write a markdown file straight into your knowledge folder, which means the watcher indexes them the same way it indexes anything else. There is no server, no account, and nothing to keep running.
- Dictate a Note — speak, and the transcription is saved
- Type a Note — type it instead
Open each link on your iPhone and add it. The first run asks permission to write to your folder; allow it once and it stops asking.
Point them at your folder. Each shortcut needs to know where the notes go. Open it in the Shortcuts app, find the save action, and choose your knowledge-work folder under iCloud Drive → Documents. Do this once per shortcut.
Make dictation reachable without looking. The typed one you will run from the Shortcuts app or the home screen, which is fine because you are looking at the phone anyway. Dictation is worth wiring to something physical, because the whole point is capturing a thought without breaking what you are doing:
| Method | Where to set it | Best for |
|---|---|---|
| Action Button | Settings → Action Button | iPhone 15 Pro and later |
| Back Tap | Settings → Accessibility → Touch → Back Tap | Any recent iPhone, double or triple tap |
| Vocal Shortcut | Settings → Accessibility → Vocal Shortcuts | Hands full, a phrase you choose |
Back Tap is the one I would start with. It works on almost everything and it is two taps on the back of the phone.
One button, both shortcuts. If you have an Action Button, it only holds one thing, which forces a choice you do not have to make. This third shortcut solves it by putting a menu on the button instead:
- Capture Menu — press once, pick from a list
Add this one after the first two are working and pointed at your folder, because you are going to select them from inside it.
Open it in the Shortcuts app and add your two capture shortcuts to the menu, then assign this one to the Action Button in Settings → Action Button. Now a single press gives you the choice: speak a note, or type one. The menu takes anything you like, so it is also where an app you open constantly or another shortcut you run daily can go, and the button stops being a decision you keep second-guessing.
Prove it. Run the dictation shortcut, say something you will recognise, then go to your machine and ask the Coach:
What did I capture on my phone just now?
Give iCloud a few seconds. When that note comes back, capture is live and the loop is closed: the thought lands wherever you are, and it is searchable by the time you sit down.
Checkpoint: a note spoken into your phone came back from a search on your Mac.
Then it is just how you work
Keep the Coach open while you work. When you are researching a decision, shaping an offer or reading three things and forming a view, ask it to write up what you worked out:
Write up what we just worked out about the pricing tiers.
It writes a markdown file into the folder you are already in, titled and dated, sitting with your other notes on that theme. The watcher makes it searchable within seconds. So next month, when the same question turns up wearing different clothes, the answer is already on your disk.
You can also ask what it has been doing:
What have I worked on this week?
It logs its own work, so that gets you an honest answer rather than your memory of one. The log is analytical and it is yours: the Coach never sends your notes anywhere, and only the record that work happened leaves your machine.
Where the notes themselves sit is the choice you made at the start. On the home folder they are on your disk and nowhere else. On the synced folder they are on your disk and in your iCloud account, which is what makes phone capture possible. Nothing in this setup copies them anywhere beyond that either way.
If something goes wrong
Tell the Coach what happened in plain English and paste anything red you see on screen. It reads the error and fixes it far more often than you would expect, which is the entire point of having an employee rather than a manual.
Two specific ones worth knowing.
Permission errors mentioning Documents. Terminal has not been granted access to the folder. Open System Settings → Privacy & Security → Files and Folders, find Terminal, and switch on Documents. If Terminal is not listed, run cd ~/Documents/knowledge-work in it once and allow the prompt that appears. This is the most common cause of a setup that will not behave, and it is a thirty second fix.
It worked for weeks, then started throwing permission errors. Check the same pane. If you granted the permission to Claude Code rather than to Terminal, a Claude Code update will have broken it, because macOS treats the updated version as a different app. Grant it to Terminal instead and it will not happen again.
A note you can see in Finder does not come back in search. On the synced folder only. When your disk gets full, iCloud can remove the local copy of a file and leave a placeholder behind, and the index reads the placeholder as empty. Open the file once to pull it back down, then ask the Coach to reindex. If it keeps happening, you are low on disk space and that is the thing to fix.
Phone capture saves the note but it never appears on the Mac. Desktop & Documents syncing is off. System Settings → your name → iCloud → Drive, and switch on “Desktop & Documents Folders”.
You closed the terminal. Nothing is lost. Reopen it, run cd ~/Documents/knowledge-work and claude, and your notes, memory and search are exactly where you left them.
What’s Next
Your knowledge is now local, tracked and searchable by meaning. Everything in this guide, though, assumes you are sat in front of the machine it is all on.
An iPad Mini weighs 300 grams. That is four times lighter than a MacBook Air, with a bigger screen than a Pro Max phone, and it disappears into a bag.
You already have the half that matters. If you took the synced folder, your notes are on the iPad right now, and you can read and edit them in the Files app. What is missing is the terminal, because Claude Code is on the Mac and the iPad needs a way in.
That way in is SSH, which is how developers have reached machines on the other side of the world since before Google existed. You type on the small device, the Mac does the work, the screen comes back to you — reading the real files on your own disk, with every command available, which is the one thing the app and browser versions cannot do.
Then you follow a YouTube tutorial and you make the two mistakes everybody makes.
The front door. The tutorial says open port 22. Do that and your Mac is a house on the internet with a sign on it saying try passwords here. Leave it open one evening and read the logs in the morning: hundreds of attempts, a data centre in Ohio, a fridge in Shenzhen nobody updated. They are not after you, they are after every open door on earth, and a script does the knocking while they sleep. Your reflections, the ones that were never meant to touch the cloud, behind a password a bot may eventually guess. The fix is not a better password. It is not having a door on the public internet at all.
The connection that dies and takes your work with it. You are at a coffee shop, Claude Code is twenty minutes into something, and the wifi drops. Over plain SSH the session on the Mac does not pause, it dies, and you reconnect to a blank cursor asking what you would like to do today. Same when the iPad locks, same when you walk to the car park and it switches to 4G.
Get both wrong and you do what everyone does, which is go back to carrying the laptop.
The Productivity Coach is $198, once, and remote access is half of what it sets up. A private tunnel between your own devices, so the Mac stays invisible to the internet and the door only opens from inside the house. A session that lives on the Mac whether you are connected or not, so the lid closing, the wifi dropping and the battery dying all stop mattering, and you come back to the words you typed but had not sent still sitting there. And, if you want it, a private GitHub repository for this folder, with a login that still works from the small device, which is the part that quietly breaks when you do it yourself.
The other half is what it does with the log you just started writing. Every time you close a session it writes that day’s progress file from your commits and your activity, and, if you connected GitHub, backs that file up. Every week and month it reads those files back to you, and turns them into a strategy and the week’s tasks in your Todoist. This guide let you keep things light: one Mac, no accounts. That one asks for a second device, and that is the point of it.
A machine at home doing the work. You at the beach, the café, the school run, or in bed at 3am when the good ideas arrive, holding something the size of a paperback.
Fair warning: it is addictive.
Next up: Set up the Productivity Coach: your day written down, backed up, and reachable from an iPad Mini.
